The Silent Killer of Clarity: A Definitive Guide to Audio Aliasing in Music Production
Aliasing is the most misunderstood artifact in digital audio. Learn what it is, where it hides in your plugins, and how to eliminate it for cleaner, more professional mixes.
Some links in this article are affiliate links. If you buy through them, Dubspot may earn a commission at no extra cost to you. It never affects our scores or what we recommend — read our policy.
You're chasing that analog warmth. You load up tape saturation, tube distortion, vintage compressors. Your mix sounds warm, sure. But something's off. There's a harsh, brittle edge. Your stereo image feels collapsed. Ghost notes appear where they shouldn't.
Welcome to aliasing—the silent killer of clarity.
Aliasing is the most misunderstood and frequently ignored artifact in digital audio. It's not a feature. It's not "vintage character." It's digital distortion that destroys your high end and muddies your mix with inharmonic content.
This guide will demystify aliasing, show you exactly where it hides, and give you practical strategies to eliminate it.
The Anatomy of a Digital Artifact
To understand aliasing, you need to understand digital audio's fundamental limitation.
The Nyquist Limit and the "Fold-Back"
Analog audio is continuous. Digital audio takes snapshots. Your sample rate determines how many snapshots per second—48 kHz means 48,000 samples per second.
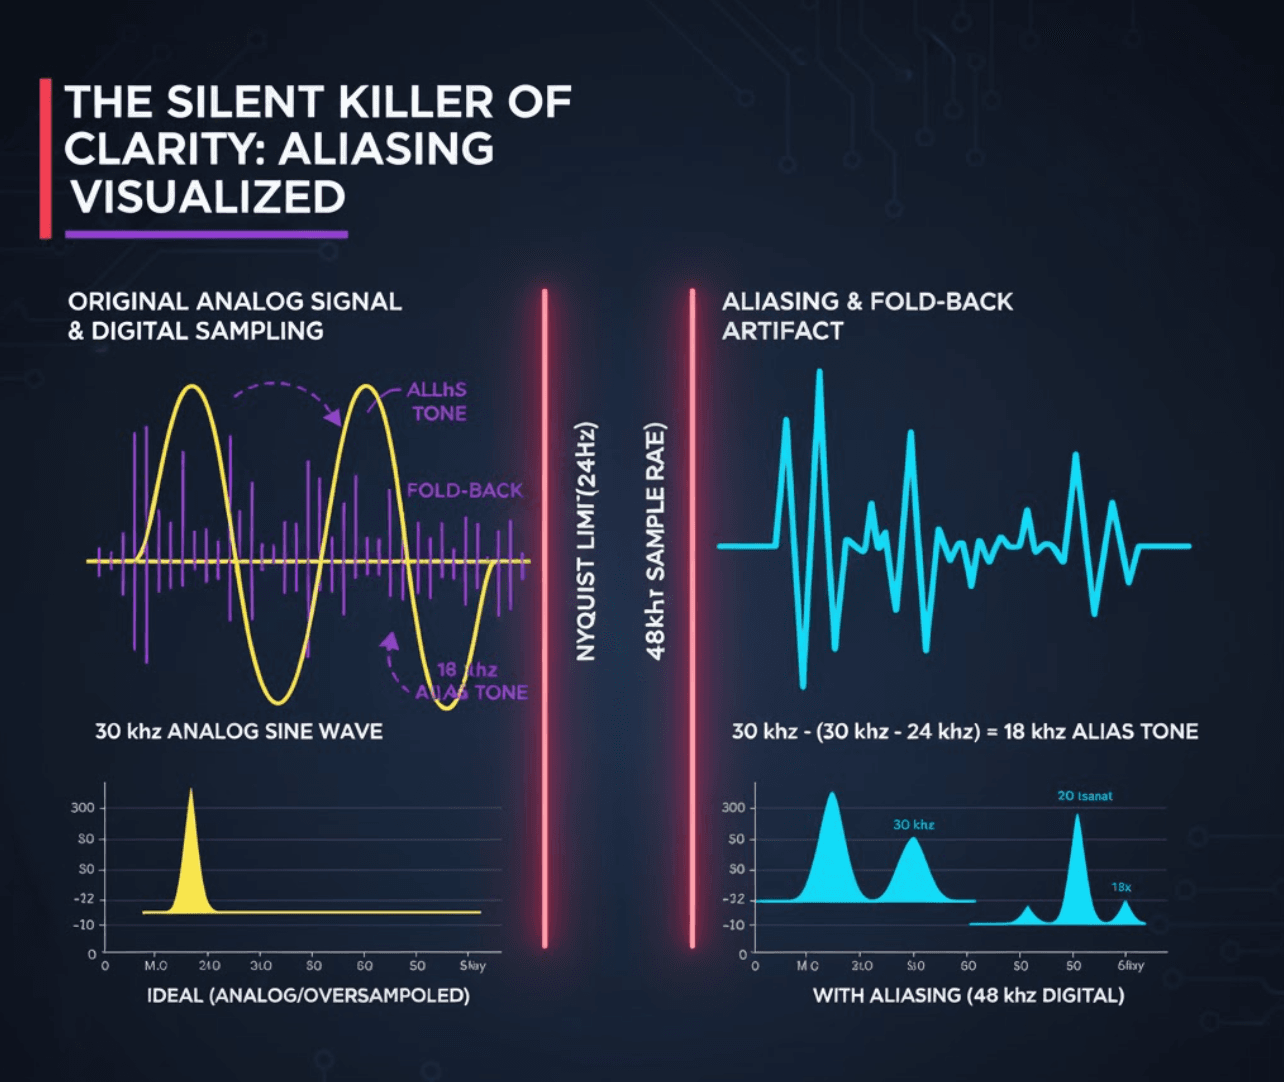
The Nyquist Theorem says a digital system can only accurately record frequencies up to half the sample rate. This upper limit is the Nyquist Frequency. At 48 kHz, your Nyquist frequency is 24 kHz.
What happens when audio contains frequencies above 24 kHz?
The system can't ignore them. It misinterprets them. These high frequencies bounce off the Nyquist limit and "fold back" down into the audible spectrum.
Real-world example: A 30 kHz frequency in a 48 kHz system is 6 kHz over the limit. It folds back and appears as a new tone at 18 kHz (24 kHz minus 6 kHz). This new tone is an "alias"—it wasn't in your original recording, and it's usually inharmonic.
What Does Aliasing Actually Sound Like?
In mixing, aliasing shows up as:
Digital Fizz: A brittle, glassy high-end that makes tracks fatiguing. You know that harsh top end that screams "amateur production"? That's often aliasing.
Ghost Notes: Dissonant tones that follow the pitch of your instrument but sound wrong. Play a synth line up high and notice weird undertones? Aliasing.
Muddiness: Accumulated inharmonic content across tracks clouds the mix. You lose separation and depth.
The Culprits: Where Aliasing Hides
Most aliasing comes from plugin processing, specifically non-linear processes. Any process that changes waveform shape generates new harmonics.
1. Saturation, Distortion, and Clipping
This is the biggest offender.
Saturation works by reshaping waveforms. This inherently generates high-frequency harmonics. When you apply tape saturation to a 10 kHz signal in a 48 kHz session, you generate harmonics at 20 kHz, 30 kHz, 40 kHz, and beyond.
The problem? The 30 kHz and 40 kHz harmonics fold back, creating dissonant tones at 18 kHz and 8 kHz. These weren't in your original signal. They're digital artifacts masquerading as analog warmth.
2. Aggressive Compression and Limiting
Fast attack and release times reshape waveforms rapidly. This is non-linear processing. Brickwall limiters are notorious for generating aliasing when pushed hard.
3. Synthesizers and Virtual Instruments
Classic analog waveforms like sawtooth and square waves are mathematically rich in harmonics. Representing these idealized shapes digitally without safeguards (band-limiting) is impossible without severe aliasing.
You'll hear high notes sound thin, harsh, and dissonant. This is why some synth plugins sound "cheap"—they're not properly band-limited.
The Solution: Oversampling and Anti-Aliasing
The industry's primary weapon against aliasing is oversampling.
How Oversampling Works
Oversampling temporarily increases the sample rate inside the plugin before processing, then decreases it afterward.
The process:
-
Upsampling: The plugin raises the sample rate (4x oversampling in a 48 kHz session means processing at 192 kHz). This raises the Nyquist frequency to 96 kHz, giving harmonics headroom.
-
Processing: Non-linear processing happens at this higher rate.
-
Anti-Aliasing Filter: A steep low-pass filter removes everything above the original Nyquist limit (24 kHz). This eliminates the high-frequency harmonics that would cause aliasing.
-
Downsampling: Audio returns to your session's sample rate.
The catch? Oversampling is CPU-intensive. This is why many plugins omit it or offer it as an option.
The Plugin Landscape: The Good, The Bad, and The Ugly
Not all plugins handle aliasing equally. This is where professional sound separates from amateur sound.
The Good: Plugins That Excel at Anti-Aliasing
FabFilter: Industry standard. Saturn 2 offers up to 32x oversampling—see our full Saturn 2 breakdown for how it scores on fidelity. Pro-L 2 and Pro-C 2 include excellent oversampling for clean sound even under heavy processing. You can grab the whole suite in the FabFilter Total Bundle.
Check FabFilter Pro-Q 4 price on Plugin BoutiqueTokyo Dawn Labs (TDR): Renowned for exceptional DSP. TDR Kotelnikov (compressor) and TDR Limiter 6 GE offer sophisticated oversampling, labeled as "Precise" or "Insane" quality settings.
Cytomic: The Glue (SSL Bus Compressor emulation) includes oversampling to handle analog circuit non-linearities without digital harshness.
u-he: Virtual instruments like Diva and Repro are CPU-intensive because they employ sophisticated internal oversampling (tied to "HQ" modes). This is why they sound so convincingly analog.
Xfer Records Serum / Vital: Modern wavetable synths use advanced band-limiting techniques, ensuring complex digital shapes produce minimal aliasing. Our Serum 2 vs Vital comparison digs into how each handles high-frequency content and CPU cost.
The Bad: Common Offenders
Stock DAW Plugins: Many stock plugins prioritize low CPU usage over fidelity. Stock distortion and overdrive units are often the worst offenders. Older Logic Overdrive or Clip Distortion plugins were notorious for aliasing when driven hard.
Older, Unmaintained Plugins: Many older VSTs developed when computer power was limited completely omitted oversampling.
Low-CPU "Analog" Emulations: Be wary of plugins promising rich analog saturation with impossibly low CPU usage. Corners were cut. The first thing to go is usually oversampling.
The "Vintage Character" Excuse: Some developers use "vintage character" as justification for aliasing. This is misleading. Analog gear doesn't alias. (Emulations of vintage digital gear like old samplers may correctly feature aliasing as authentic to the original.)
What Plugin Developers Are Missing
Why do so many plugins still exhibit poor anti-aliasing?
The CPU Trade-Off
Oversampling is expensive computationally. Running a plugin at 8x oversampling requires significantly more processing power. Developers prioritize low CPU usage so users can run multiple instances.
The Complexity of Filter Design
The anti-aliasing filter used during downsampling is critical. Designing a good one is hard DSP engineering.
If the filter is too gentle, it won't remove all aliases. If it's too steep, it introduces phase shift (altering tonality) or pre-ringing (subtle smearing before transients). Developers must balance these factors. Many use subpar filter designs.
Lack of Transparency
Many plugins don't clearly indicate if oversampling is active or what rate is being used. Others offer an "HQ" button without explaining what it does. This prevents engineers from making informed decisions.
Practical Guide to Detecting and Mitigating Aliasing
How do you ensure aliasing doesn't ruin your mixes?
The Sine Sweep Test
The definitive way to identify aliasing uses a spectrum analyzer and sine wave.
Step-by-step:
- Load a test oscillator in your DAW (set to sine wave).
- Load the plugin you're testing after the oscillator.
- Load a spectrum analyzer after the plugin (Voxengo SPAN is free, or use FabFilter Pro-Q 4). Set analyzer resolution high.
- Set oscillator to 5 kHz.
- Observe the analyzer. You should see the fundamental (5 kHz) and harmonics above (10 kHz, 15 kHz, etc.).
- Slowly sweep the frequency upward toward the Nyquist limit (20 kHz).
- Watch for fold-back. If the plugin aliases, you'll see frequencies move downward on the analyzer as harmonics bounce off the Nyquist limit. Energy appearing below the fundamental is severe aliasing.
- Enable plugin oversampling (if available) and repeat. Aliasing should be significantly reduced or eliminated.
Strategic Use of Oversampling
Enable oversampling on non-linear plugins. Use at least 4x. If you hear harshness on bright material (cymbals, bright synths, vocals), try 8x or 16x.
The "Mix Low, Render High" Workflow
Oversampling can cripple your CPU during mixing. Professional workflow: leave oversampling at lower settings during tracking and mixing. Before final export, enable highest quality oversampling on all relevant plugins. Many plugins offer separate settings for real-time playback versus offline rendering.
The 96 kHz Debate
Working at 96 kHz raises the Nyquist frequency, naturally reducing audible aliasing. But it doubles CPU load and file sizes for your entire project. For most producers, utilizing plugin oversampling at standard sample rates (44.1 or 48 kHz) is more efficient.
Conclusion: The Pursuit of Purity
Aliasing is a fundamental challenge in digital signal processing. It's a ghost in the machine that separates the sonic integrity of the analog world from the compromises of the digital domain.
The good news? You can overcome it.
Demand higher standards from plugin developers. Choose your tools wisely—our best effect plugins ranking weighs oversampling and DSP quality, not just features. Implement smart workflows like strategic oversampling and plugin analysis. Test your plugins with sine sweeps. Your mixes will be clearer, deeper, and free from unwanted digital distortion.
The pursuit of analog warmth shouldn't come at the cost of digital artifacts. With the right knowledge and tools, you can have both.
Ready to upgrade your plugin collection? Browse Dubspot's verified live plugin deals.